Serverless Workflows
Documentation section of the project selected set of workflows.
How to add
Documents can include markdown content from all the related parodos-dev repositories.
To create a document entry from a markdown file use this:
./generate-doc-for-repo.sh \
    https://github.com/parodos-dev/serverless-workflows/blob/main/README.md > content/docs/workflows/newdoc.md
1 - Development
serverless-workflows
A selected set of serverless workflows
The structure of this repo a directory per workflow at the root. Each folder
contains at least:
application.properties the configuration item specific for the workflow app itself.${workflow}.sw.yaml the serverless workflow definitions.specs/ optional folder with OpenAPI specs if the flow needs them.
All .svg can be ignored, there’s no real functional use for them in deployment
and all of them are created by VSCode extension. TODO remove all svg and gitignore them.
Every workflow has a matching container image pushed to quay.io by a github workflows
in the form of quay.io/orchestrator/serverless-workflow-${workflow}.
Current image statuses:
After image publishing, github action will generate kubernetes manifests and push a PR to the workflows helm chart repo
under a directory matching the workflow name. This repo is used to deploy the workflows to an environment
with Sonataflow operator running.
To introduce a new workflow
- create a folder under the root with the name of the flow, e.x
/onboarding - copy
application.properties, onboarding.sw.yaml into that folder - create a github workflow file
.github/workflows/${workflow}.yaml that will call main workflow (see greeting.yaml) - create a pull request but don’t merge yet.
- Send a pull request to the helm chart repo to add a sub-chart
under the path
charts/workflows/charts/onboarding. You can copy the greeting sub-chart directory and files. - Create a PR to serverless-workflows-config and make sure its merge.
- Now the PR from 4 can be merged and an automatic PR will be created with the generated manifests. Review and merge.
See Continuous Integration with make for implementation details of the CI pipeline.
Builder image
There are two builder images under ./pipeline folder:
- workflow-builder-dev.Dockerfile - references nightly build image from
docker.io/apache/incubator-kie-sonataflow-builder:main that doesn’t required any authorization - workflow-builder.Dockerfile - references OpenShift Serverless Logic builder image from registry.redhat.io which requires authorization.
- To use this dockerfile locally, you must be logged to registry.redhat.io. To get access to that registry, follow:
- Get tokens here. Once logged in to podman, you should be able to pull the image.
- Verify pulling the image here
Note on CI:
On each merge under a workflow directory a matching github workflow executes
an image build, generating manifests and a PR create on the helm chart repo.
The credentials of this repo are an org level secret, and the content is from a token
on the helm repo with an expiry period of 60 days. Currently only the repo owner (rgolangh) can
recreate the token. This should be revised.
2 - Troubleshooting
Troubleshooting Guide
This document provides solutions to common problems encountered with serverless workflows.
Table of Contents
- Workflow Errors
- Configuration Problems
- Performance Issues
- Error Messages
- Network Problems
- Common Scenarios
- Contact Support
Workflow Errors
Problem: Workflow execution fails
Solution:
- Examine the container log of the workflow
oc logs my-workflow-xy73lj
Problem: Workflow is not listed by the orchestrator plugin
Solution:
Examine the container status and logs
    oc get pods my-workflow-xy73lj
    oc logs my-workflow-xy73lj
Most probably the Data index service was unready when the workflow started.
Typically this is what the log shows:
2024-07-24 21:10:20,837 ERROR [org.kie.kog.eve.pro.ReactiveMessagingEventPublisher] (main) Error while creating event to topic kogito-processdefinitions-events for event ProcessDefinitionDataEvent {specVersion=1.0, id='586e5273-33b9-4e90-8df6-76b972575b57', source=http://mtaanalysis.default/MTAAnalysis, type='ProcessDefinitionEvent', time=2024-07-24T21:10:20.658694165Z, subject='null', dataContentType='application/json', dataSchema=null, data=org.kie.kogito.event.process.ProcessDefinitionEventBody@7de147e9, kogitoProcessInstanceId='null', kogitoRootProcessInstanceId='null', kogitoProcessId='MTAAnalysis', kogitoRootProcessId='null', kogitoAddons='null', kogitoIdentity='null', extensionAttributes={kogitoprocid=MTAAnalysis}}: java.util.concurrent.CompletionException: io.netty.channel.AbstractChannel$AnnotatedConnectException: Connection refused: sonataflow-platform-data-index-service.default/10.96.15.153:80
Check if you use a cluster-wide platform:
   $ oc get sonataflowclusterplatforms.sonataflow.org
   cluster-platform
If you have, like in the example output, then use the namespace sonataflow-infra when you look for the sonataflow services
Make sure the Data Index is ready, and restart the workflow - notice the sonataflow-infra namespace usage:
    $ oc get pods -l sonataflow.org/service=sonataflow-platform-data-index-service -n sonataflow-infra
    NAME                                                      READY   STATUS    RESTARTS   AGE
    sonataflow-platform-data-index-service-546f59f89f-b7548   1/1     Running   0          11kh

    $ oc rollout restart deployment my-workflow
Problem: Workflow is failing to reach an HTTPS endpoint because it can’t verify it
Solution:
- If this happens then we need to load the additional CA cert into the running
workflow container. To do so, please follow this guile from the SonataFlow guides site:
https://sonataflow.org/serverlessworkflow/main/cloud/operator/add-custom-ca-to-a-workflow-pod.html
Configuration Problems
Problem: Workflow installed in a different namespace than Sonataflow services fails to start
Solution:
When deploying a workflow in a namespace other than the one where Sonataflow services are running (e.g., sonataflow-infra), there are two essential steps to follow if persistence is required for the workflow:
- Create a Secret with PostgreSQL Credentials in the target namespace:
- The workflow needs to create its own schema in PostgreSQL. To enable this, you must create a secret containing the PostgreSQL credentials in the same namespace as the workflow.
- Configure the Namespace Attribute:
- Add the namespace attribute under the serviceRef where the PostgreSQL server is deployed.
Example Configuration:
apiVersion: sonataflow.org/v1alpha08
kind: SonataFlow
...
spec:
  ...
  persistence:
    postgresql:
      secretRef:
        name: sonataflow-psql-postgresql
        passwordKey: postgres-password
        userKey: postgres-username
      serviceRef:
        databaseName: sonataflow
        databaseSchema: greeting
        name: sonataflow-psql-postgresql
        namespace: <postgresql-namespace>
        port: 5432
In this configuration:
- Replace with the namespace where the PostgreSQL server is deployed.
By following these steps, the workflow will have the necessary credentials to access PostgreSQL and will correctly reference the service in a different namespace.
TBD
Error Messages
TBD
Network Problems
TBD
Common Scenarios
3.1 - MTA Analysis
MTA - migration analysis workflow
Synopsis
This workflow is an assessment workflow type, that invokes an application analysis workflow using MTA
and returns the move2kube workflow reference, to run next if the analysis is considered to be successful.
Users are encouraged to use this workflow as self-service alternative for interacting with the MTA UI. Instead of running
a mass-migration of project from a managed place, the project stakeholders can use this (or automation) to regularly check
the cloud-readiness compatibility of their code.
repositoryUrl [mandatory] - the git repo url to examinerecipients [mandatory] - A list of recipients for the notification in the format of user:<namespace>/<username> or group:<namespace>/<groupname>, i.e. user:default/jsmith.
Output
- On completion the workflow returns an options structure in the exit state of the workflow (also named variables in SonataFlow)
linking to the move2kube workflow that will generate k8s manifests for container deployment.
- When the workflow completes there should be a report link on the exit state of the workflow (also named variables in SonataFlow)
Currently this is working with MTA version 6.2.x and in the future 7.x version the report link will be removed or will be made
optional. Instead of an html report the workflow will use a machine friendly json file.
Dependencies
Runtime configuration
| key | default | description |
|---|
| mta.url | http://mta-ui.openshift-mta.svc.cluster.local:8080 | Endpoint (with protocol and port) for MTA |
| quarkus.rest-client.mta_json.url | ${mta.url}/hub | MTA hub api |
| quarkus.rest-client.notifications.url | ${BACKSTAGE_NOTIFICATIONS_URL:http://backstage-backstage.rhdh-operator/api/notifications/} | Backstage notification url |
| quarkus.rest-client.mta_json.auth.basicAuth.username | username | Username for the MTA api |
| quarkus.rest-client.mta_json.auth.basicAuth.password | password | Password for the MTA api |
All the configuration items are on [./application.properties]
Testing
User can test the MTA workflow by providing a git repository.
Existing Repository
An existing repository can be used. Alternatively, user can use example repo: spring-petclinic
New Repository
- Create a git repo with a simple Java class. It can either be public or private.
Currently, MTA supports mostly Java projects.
- If repository is private, refer to configuring repository on how to set up credentials on MTA.
- Note: When creating the source control credentials in MTA (usually done by MTA admin), ensure to input personal access token in the password field.
Refer to [personal access token] 5 on how to create personal access token (classic) on GitHub.
- Also, git url address must use https. Refer to about remote repositories for more details.
- If the repo is public, no further configuration is needed.
Workflow Diagram

4.1 - Simple Escalation
Simple escalation workflow
An escalation workflow integrated with Atlassian JIRA using SonataFlow.
Prerequisite
- Access to a Jira server (URL, user and API token)
- Access to an OpenShift cluster with
admin Role
Workflow diagram

Note:
The value of the .jiraIssue.fields.status.statusCategory.key field is the one to be used to identify when the done status is reached, all the other
similar fields are subject to translation to the configured language and cannot be used for a consistent check.
Application configuration
Application properties can be initialized from environment variables before running the application:
| Environment variable | Description | Mandatory | Default value |
|---|
JIRA_URL | The Jira server URL | ✅ | |
JIRA_USERNAME | The Jira server username | ✅ | |
JIRA_API_TOKEN | The Jira API Token | ✅ | |
JIRA_PROJECT | The key of the Jira project where the escalation issue is created | ❌ | TEST |
JIRA_ISSUE_TYPE | The ID of the Jira issue type to be created | ✅ | |
OCP_API_SERVER_URL | The OpensShift API Server URL | ✅ | |
OCP_API_SERVER_TOKEN | The OpensShift API Server Token | ✅ | |
ESCALATION_TIMEOUT_SECONDS | The number of seconds to wait before triggering the escalation request, after the issue has been created | ❌ | 60 |
POLLING_PERIODICITY(1) | The polling periodicity of the issue state checker, according to ISO 8601 duration format | ❌ | PT6S |
(1) This is still hardcoded as PT5S while waiting for a fix to KOGITO-9811
How to run
Example of POST to trigger the flow (see input schema in ocp-onboarding-schema.json):
curl -XPOST -H "Content-Type: application/json" http://localhost:8080/ticket-escalation -d '{"namespace": "_YOUR_NAMESPACE_"}'
Tips:
- Visit Workflow Instances
- Visit (Data Index Query Service)[http://localhost:8080/q/graphql-ui/]
4.2 - Move2Kube
Move2kube (m2k) workflow
Context
This workflow is using https://move2kube.konveyor.io/ to migrate the existing code contained in a git repository to a K8s/OCP platform.
Once the transformation is over, move2kube provides a zip file containing the transformed repo.
Design diagram
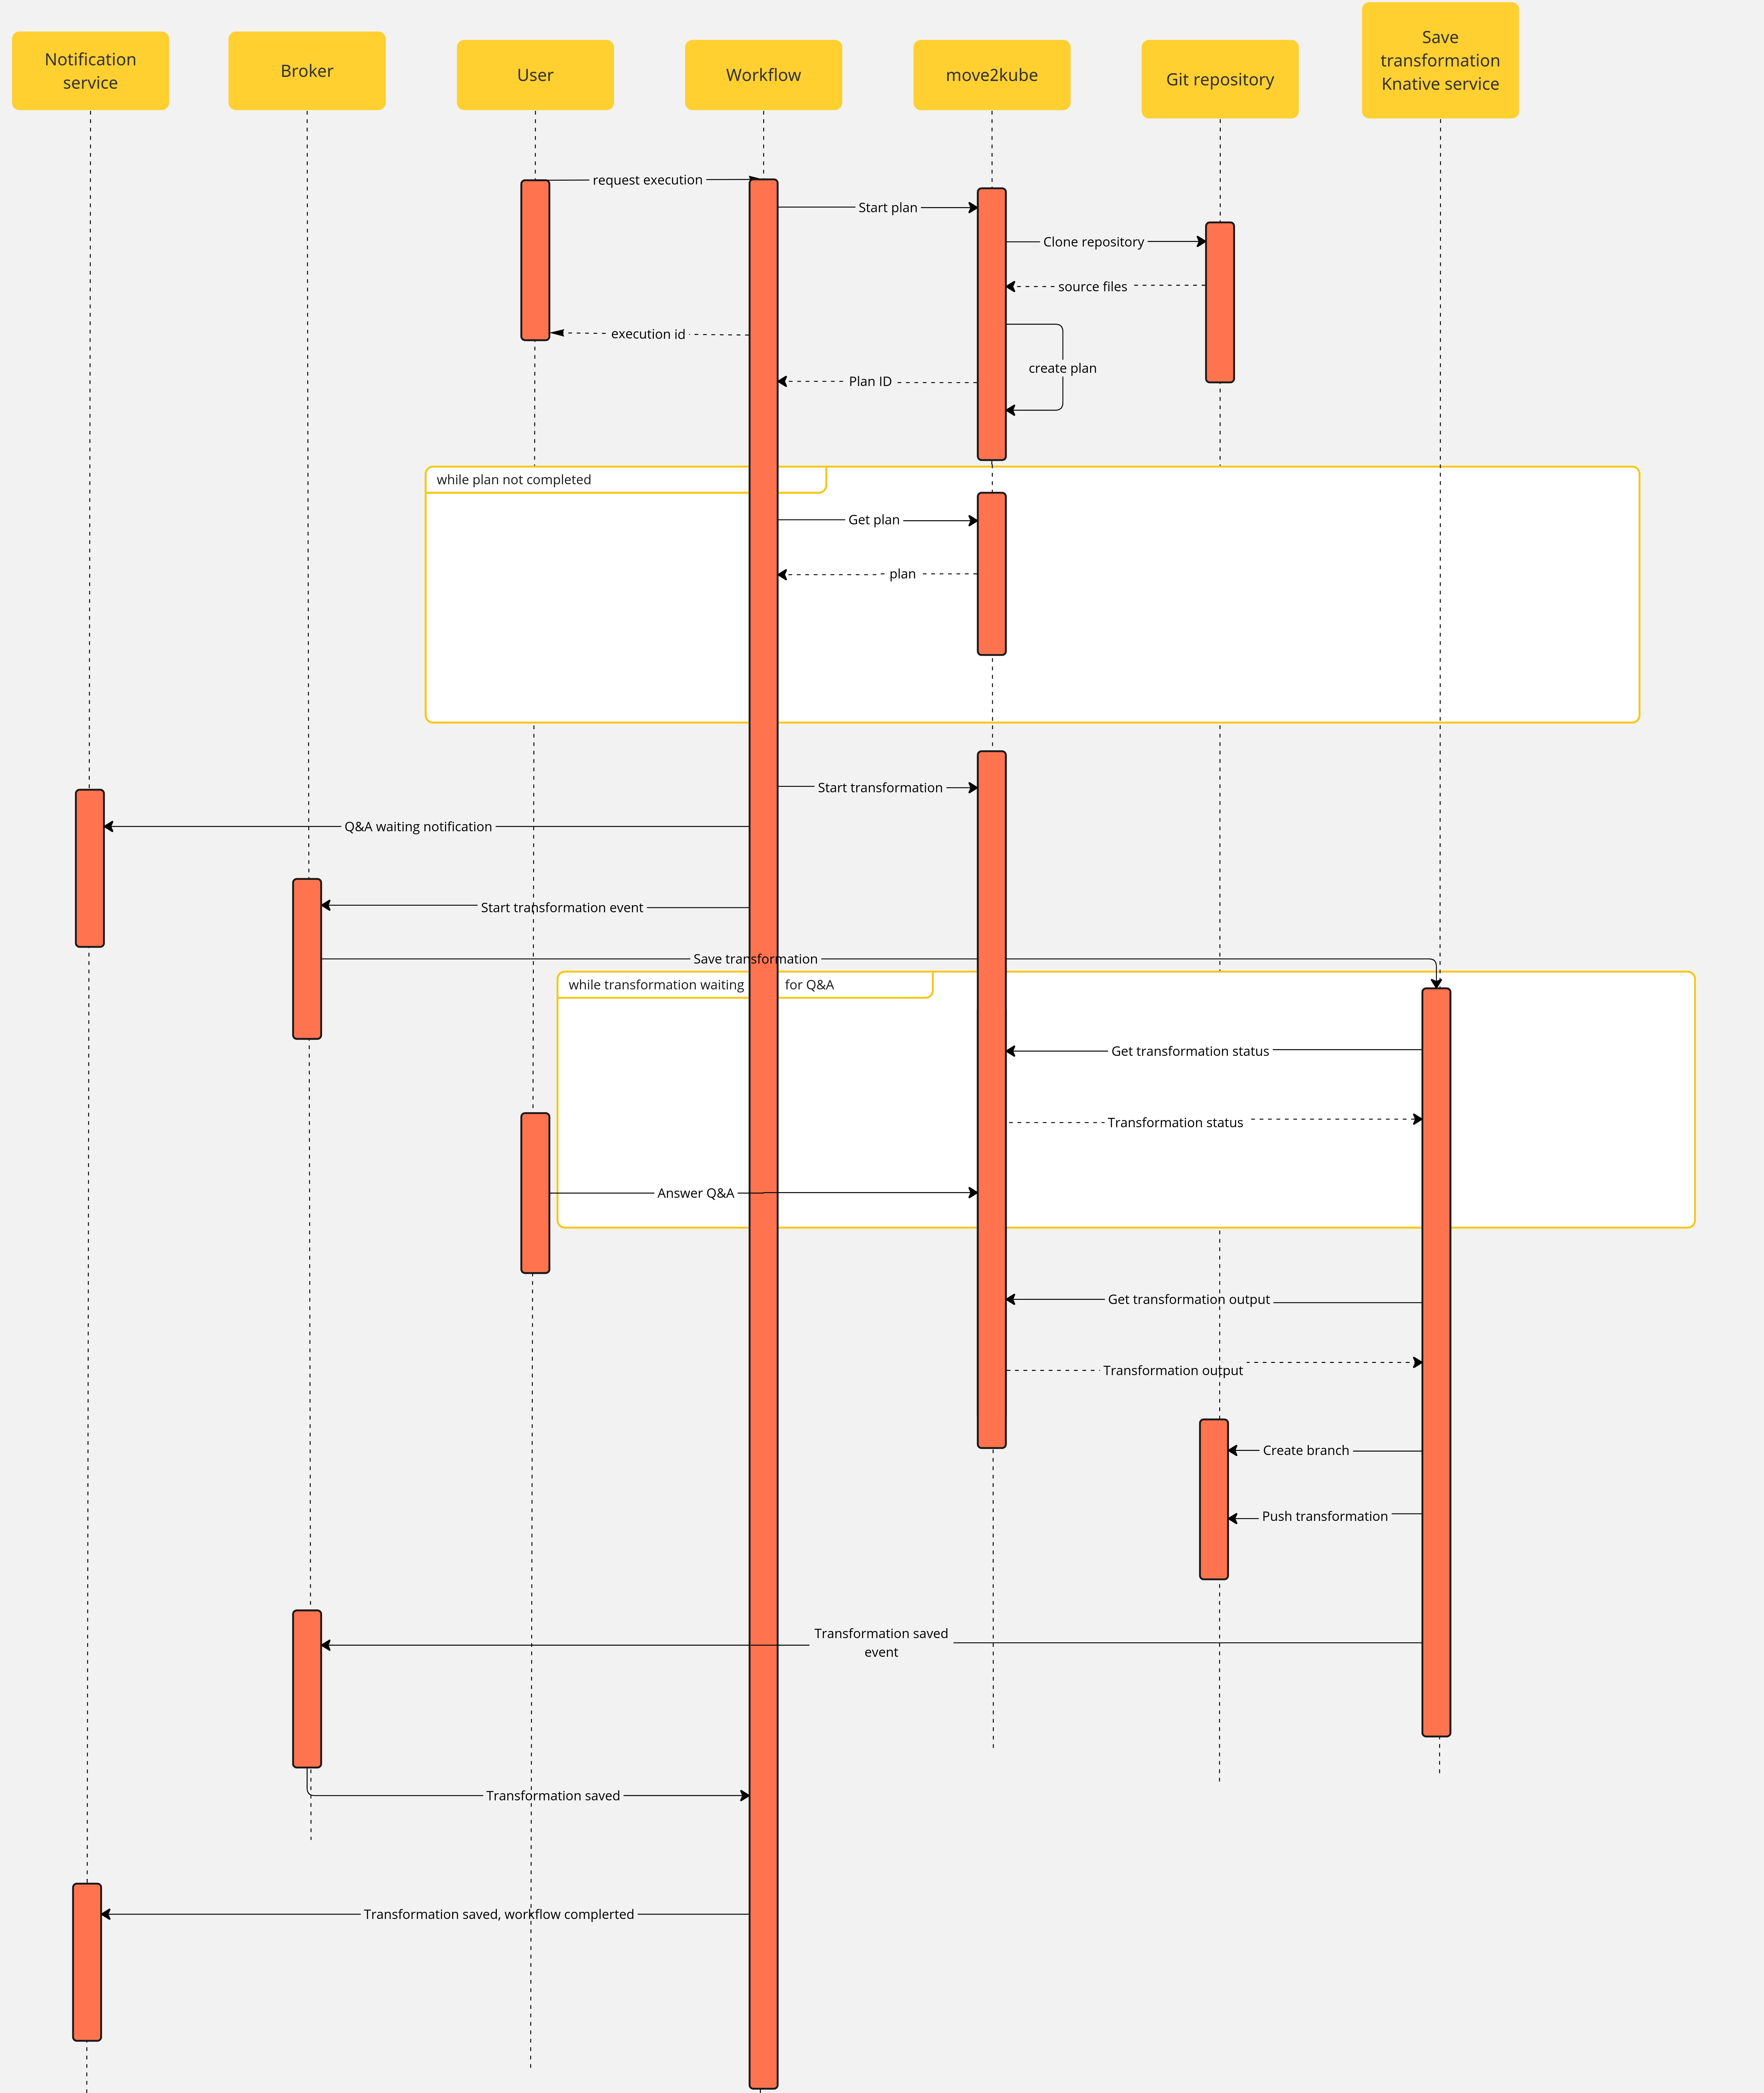

Workflow

Note that if an error occurs during the migration planning there is no feedback given by the move2kube instance API. To overcome this, we defined a maximum amount of retries (move2kube_get_plan_max_retries) to execute while getting the planning before exiting with an error. By default the value is set to 10 and it can be overridden with the environment variable MOVE2KUBE_GET_PLAN_MAX_RETRIES.
Components
The use case has the following components:
m2k: the Sonataflow resource representing the workflow. A matching Deployment is created by the sonataflow operator..m2k-save-transformation-func: the Knative Service resource that holds the service retrieving the move2kube instance output and saving it to the git repository. A matching Deployment is created by the Knative deployment.move2kube instance: the Deployment running the move2kube instance- Knative
Trigger:m2k-save-transformation-event: event sent by the m2k workflow that will trigger the execution of m2k-save-transformation-func.transformation-saved-trigger-m2k: event sent by m2k-save-transformation-func if/once the move2kube output is successfully saved to the git repository.error-trigger-m2k: event sent by m2k-save-transformation-func if an error while saving the move2kube output to the git repository.
- The Knative
Broker named default which link the components together.
Usage
- Create a workspace and a project under it in your move2kube instance
- you can reach your move2kube instance by running
oc -n sonataflow-infra get routes
NAME                                   HOST/PORT                                                                                             PATH   SERVICES                                 PORT    TERMINATION   WILDCARD
move2kube-route                        move2kube-route-sonataflow-infra.apps.cluster-c68jb.dynamic.redhatworkshops.io                               move2kube-svc                            <all>   edge          None
- Go to the backstage instance.
To get it, you can run
oc -n rhdh-operator get routes
Sample output:
NAME                  HOST/PORT                                                                            PATH   SERVICES              PORT           TERMINATION     WILDCARD
backstage-backstage   backstage-backstage-rhdh-operator.apps.cluster-c68jb.dynamic.redhatworkshops.io   /      backstage-backstage   http-backend   edge/Redirect   None
Go to the Orchestrator page.
Click on Move2Kube workflow and then click the run button on the top right of the page.
In the repositoryURL field, put the URL of your git project
In the sourceBranch field, put the name of the branch holding the project you want to transform
In the targetBranch field, put the name of the branch in which you want the move2kube output to be persisted. If the branch exists, the workflow will fail
In the workspaceId field, put the ID of the move2kube instance workspace to use for the transformation. Use the ID of the workspace created at the 1st step.
- ie:
a46b802d-511c-4097-a5cb-76c892b48d71
In the projectId field, put the ID of the move2kube instance project under the previous workspace to use for the transformation. Use the ID of the project created at the 1st step.
- ie:
9c7f8914-0b63-4985-8696-d46c17ba4ebe
Then click on nextStep
Click on run to trigger the execution
Once a new transformation has started and is waiting for your input, you will receive a notification with a link to the Q&A
Once you completed the Q&A, the process will continue and the output of the transformation will be saved in your git repository, you will receive a notification to inform you of the completion of the workflow.
- You can now clone the repository and checkout the output branch to deploy your manifests to your cluster! You can check the move2kube documention if you need guidance on how to deploy the generated artifacts.